VR headsets have been on the rise and, they definitely show no signs of stopping. With so many people stuck at home due to the current world’s situation, it is only natural that escaping to a fully-fledged virtual world is becoming the norm. VR headsets are that entrance to virtual worlds that bring hours upon hours of joy, wonders and discovery but, some people can have some trouble enjoying such headsets when their own eyes struggle to see them.
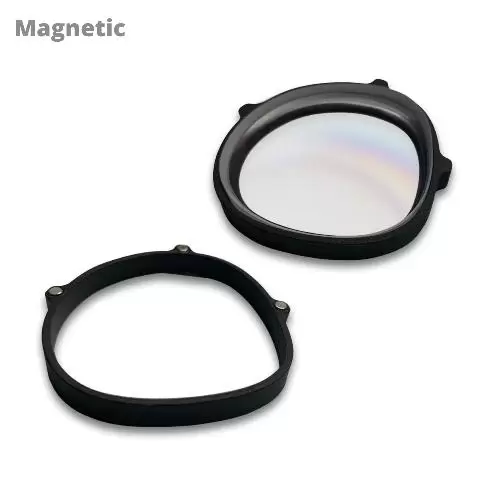
What Are The VR Wave Prescription Lenses?
Even though VR headsets already come equipped with their own lenses (in order to transmit the image to the users), these lenses are usually made with the general public in mind, without any eyesight problems, which can truly deter the experience for those users that need prescription glasses in order to see clearly. Because VR gaming and VR experiences should be available to everyone, companies such as VR Wave have dedicated themselves to providing prescription lenses that are carefully crafted with a plethora of VR headsets in mind but, what exactly are these prescription lenses?
Prescription lenses are customizable, custom-made lenses that are specially crafted with your SPH, CYL and AXS values in mind for both the left and right lenses, so they fit your eyes perfectly as prescription lenses should. In short, VR headset prescription lenses are made so you can enjoy your VR headset without having the hassle of wearing your glasses underneath.
What Are The Benefits?
When it comes to the benefits that may come with purchasing prescription lenses for your VR headsets, the obvious one would be that the users can see the virtual worlds and the content displayed clearly in said headsets without having to wear glasses underneath but, that is just the tip of the iceberg! VR Wave’s prescription lenses are tailor-made with your eyes in mind, therefore, they are highly customizable, meaning that they will fit your eyes and your needs perfectly.
Installation
Most people might think that installing the prescription lenses onto the VR headset might be a complicated and time-consuming process, however, that doesn’t have to be the case. VR Wave’s prescription lenses are incredibly easy to install and to use, making it as quick and simple of an installation process as possible.
These products come with a magnetic mount as well as magnetic prescription lenses, making them simple to attach and detach, without compromising comfortability. As it is mentioned on the website, these lenses can take less than 5 seconds to install so you can enjoy your prescription lenses, as soon as possible.
Blue Light Filter
When you spend too long in front of the screen, your eyes can develop some complications. Blue light is a kind of light ray that is emitted by electronic devices such as TVs, smartphones, tablets, computers and VR headsets, among others. Blue light can lead to some eye problems such as decreasing contrast and digital eye strain, which is why having blue light filters incorporated into your prescription lenses is of utmost importance. VR Wave’s prescription lenses offer the option of adding a blue light filter so your eyes are safe and sound as you are traversing the virtual worlds that reside in virtual reality!
Anti-Glare Coating
Prescription glasses wearers probably faced glare problems once or twice during their use, which is quite common. Glare can happen when light is reflected by the prescription glasses’ lenses and, even though this is usually due to natural light or artificial light, it can also happen when using a VR headset. VR Wave also offers protection for these scenarios with their anti-glare coating, so no light obfuscates the beauty and adventurous wonders that await you in the virtual world.
Supported VR Headsets
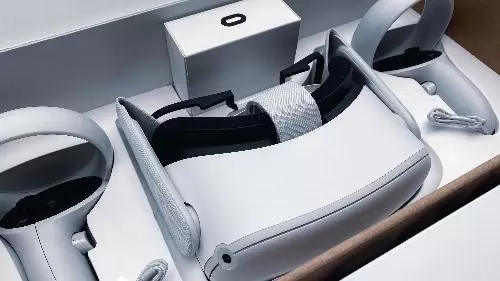
With so many different kinds of VR headsets, it is understandable that doubts come to mind when it comes to purchasing the right prescription lenses, however, with VR Wave that worry is gone. VR Wave has a vast library of VR headsets that it supports. The VR Headsets that VR Wave supports are: Oculus Quest 2, Oculus Quest 1, Rift S, Valve Index, HP Reverb G2, HTC Vive, HTC Vive Pro, HTC Vive Focus and PSVR!
Price
Prescription lenses for VR headsets can be quite pricey, after all, they need to be tailor-made for the users, as well as having installation mechanisms that provide both comfort and uncomplicated implementation, however, VR Wave has some of the most competitive prices on the market. With an affordable base price of 50$, it offers a fantastic middle ground between price and quality that is unmatched when compared to other companies that focus on prescription lenses for VR headsets.
Shipping Time And Fees
We’ve all had that annoying moment where we’ve ordered a product online and had to wait months for it to reach us, paying exuberant shipping fees that go way beyond what we have initially expected. Shipping time and fees can be quite a complex matter for many companies out there but VR Wave focuses on delivering the most competitive prices when it comes to getting your new expertly crafted prescription lenses to your address in a timely manner, after manufacturing. Below is a graph that showcases both the fees and the expecting shipping times:
|
| Shipping Fee | Global Delivery Time | Manufacturing Time |
| VR Wave | 9$ (US) 12$-18$ (Europe) 15$ (Global) FREE – Orders above 150$
| 5-10 Days
| 7 Days |
Should You Get VR Wave’s Prescription Lenses?
Using VR headsets when you are a prescription glass wearer can be quite a hassle but, with VR Wave, that doesn’t have to be the case. VR Wave supports a vast array of VR Headsets but its prescription lenses are of pristine quality, offering add-ons such as blue light filter and anti-glare coating, as well as being tailor-made for your eyes only. In case you are someone that needs to wear prescription lenses then VR Wave’s prescription lenses are a must, so you can enjoy your VR Headset without the discomfort of wearing glasses underneath, all while seeing as clear as if you were!
Virtual arena is a designed multiplayer shooter with free roam, integrated in the prepared room. The game is uploaded through the connection to headsets via a remote server of the company with a unique number. There is a special address for every arena. This address leads to the location that was chosen by the operator for struggle. Powerful routers are installed in the room. These routers provide a good connection, and the perimeter of the arena is equipped with tracking strips, providing the initial basis for the device. Before the arena launching the headsets are calibrated by operators and read the entire perimeter through their external cameras. The placement of standard arena can vary from 60 to 400 m2, that allows 4- 10 players to participate at a time.
Oculus Flicker! Im really frustrated with Oculus. It appears after a recent oculus update to version 18, my controllers/hands keep flickering when I play games. It would be good if I could downgrade back to the original version, but I can't. I had a look everywhere on the internet, including Oculus Forum, but no luck. You would have thought that the developers from Oculus would have tested this first. It's so annoying! Hopefully Oculus fix this and send out an update soon.
Oculus link not working?
A cheaper alternative
Want to play all those high-end games on your Oculus Quest, but finding it hard to get hold of a compatible data cable? Like any accessory, choosing the right one can be difficult.
Finding the right product
Amazon can be confusing at times. A search will often show you a list of hundreds of products, but not necessarily the correct products or item you searched for. We've all seen that right! It's just as difficult and confusing, more so to be honest, when it comes to cables, wires and adapters. Well, the search is over. If you're looking for a data link cable for the Oculus Quest, you've come to the right place.
There are so many variants of cables for the Quest, but you don't want to end up with yet another charging cable, it's a data cable you're after.
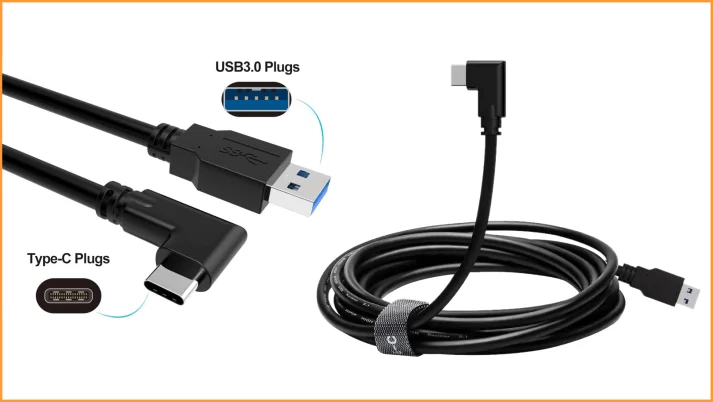
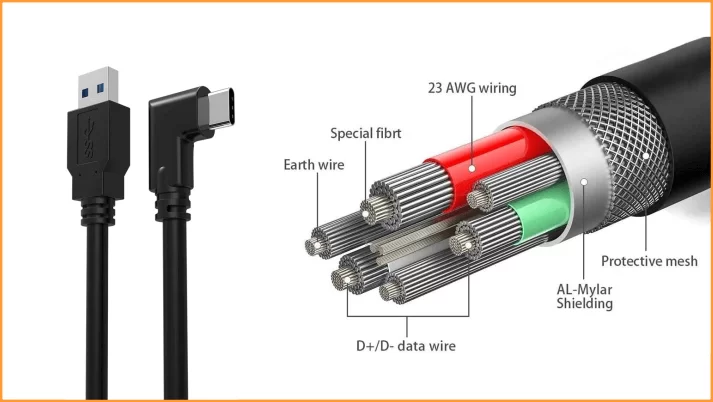
The data link cable offered by Syntech is a very good choice for the Meta Quest 3. This compatible data cable ticks all the boxes, and it's one we've tried and tested, so we know it works. This cable is a fantastic choice and certainly a cheaper alternative to the more expensive Meta Link cable.
What does the data link do?
Connecting the link cable to the Quest headset allows full access to Rift games and experiences from a gaming PC on Oculus Quest. The link cable mentioned here is fully compatible with the Quest VR headset, allowing you to play all those exciting high-end, AAA PC VR games like Asgard’s Wrath, Stormland and Half Life Alyx on the Quest.
Tried and tested
The data cable mentioned here, as well as the Eyglo Link Cable (bottom of page), worked perfectly well in the tests we performed using the Quest headset.
Don't forget to read the PC and graphic card requirements below.
Specs and Features
-
USB-C to USB-C type connectors
-
Oculus Link Software compatible
-
Reversible USB C connector
-
90 degree angle on USB C, for low profile (ease of use)
-
Flexible, lightweight and durable
-
High quality spiral shielding
-
The data link cable is 3 meters (10 feet) in length
-
Data speed rates up to 5 Gbps
-
Tested at over 1,333 Megabits
-
Charges your headset while you play (3A)
Benefits
The data link cable also comes with a small Velcro strap, conveniently attached to the cable. This allows you to strap the cable to the side of the headset, keeping the wire out of the way so it doesn’t irritate you when gaming... furthermore, the cable has charging built in and is powerful enough to charge the headset whilst you're playing, so you never have to worry about the headset dying on you halfway through a game.
Where can I buy it?
The Link cable can be purchased on Amazon by clicking on the link below...
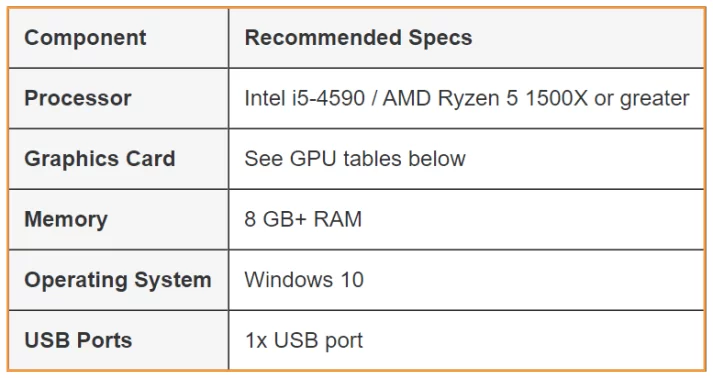
Important: During the beta period Oculus are continuing to test and optimise the Oculus Link experience for PCs that meet the current recommended specifications for the Oculus Rift and Rift S. The following table lists the current PC requirements for Oculus Link.
PC Requirements
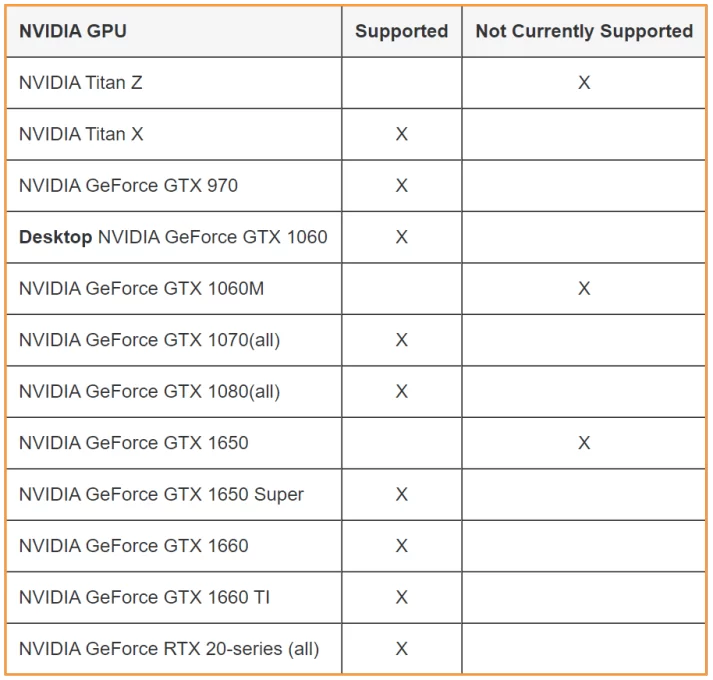
Supported GPUs (graphics cards) for Oculus Link Beta
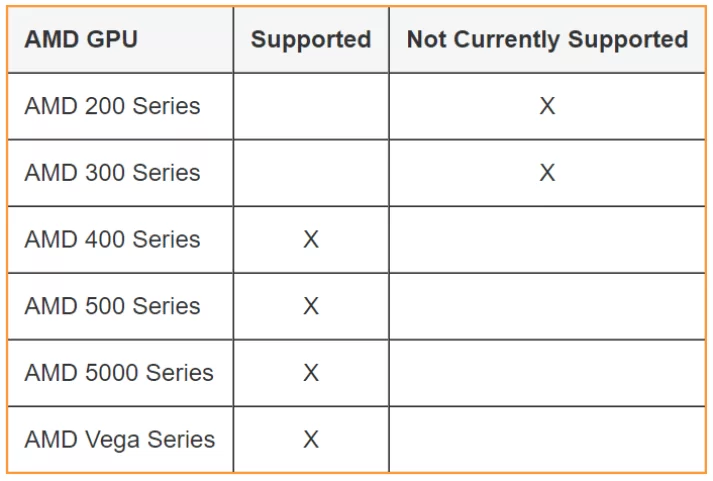
Oculus state that they are using this beta period to continue to test, iterate and validate Graphics Processing Units (GPUs). Oculus plan to support more graphic cards by the end of the beta period.
NVIDIA Graphic Cards
AMD Graphic Cards
Need a longer Oculus Link Cable?
The Eyglo Link Cable, another Oculus cable that worked perfectly with the Quest headset, offer varied length cables. As well as the standard 3 metre cable, you can also buy a 4 and 5 metre version.
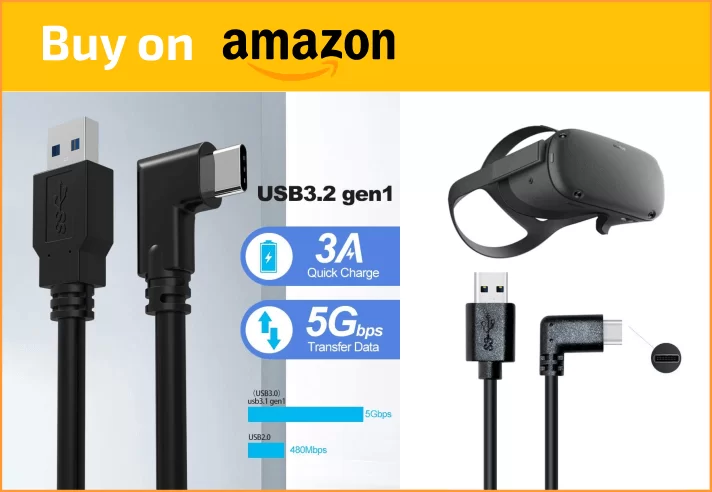
Have any feedback on these compatible Oculus link cables?... pop any comments in the box below.
Half-Life: Alyx - Pistol
There are only three guns you’ll come across in Half-Life; Alyx, the Pistol, Shotgun and Small Machine Gun (SMG), all of which can be upgraded at the Combine Fabricator. There are also two types of grenades at your disposal - the standard grenade and the Xen grenade.
Alyx's Pistol
The pistol - your very first weapon; a modified M1911 with the default clip storing a maximum of 10 bullets - it’s the standard weapon. You acquire the pistol in the chapter ‘Entanglement’, shortly after you obtain the gravity gloves (‘Russells’). Alyx (you) are given the pistol by Russell... well, thrown to you from the top window of his secret hideout. The pistol is automatic, so fires rapidly, ideal for taking out Zombies, Headcrabs, and Combine soldiers from almost any distance. The pistol isn’t as powerful as the shotgun by any means, but holds more bullets and is more manageable - in that it’s quicker to load.
Loading the pistol
Reloading the pistol is a doddle. Gun in hand, retrieve a new magazine by reaching and grabbing over your shoulder with your non-dominant hand. Then physically load it into the butt of the gun. You then need to engage the magazine or it won't fire. You do this by simply pressing the button on your controller (usually the top one). To eject an empty magazine press the opposite button (usually the bottom one).
As with all guns, the pistol can be upgraded. Upgrades vary and are dependent on how much resin you’ve collected. The chart below show the various costs in ‘resin currency’ and what each upgrade provides.
Note: You'll need to locate a Combine Fabricator to upgrade your weapons... after you've solved the holographic puzzle that is!
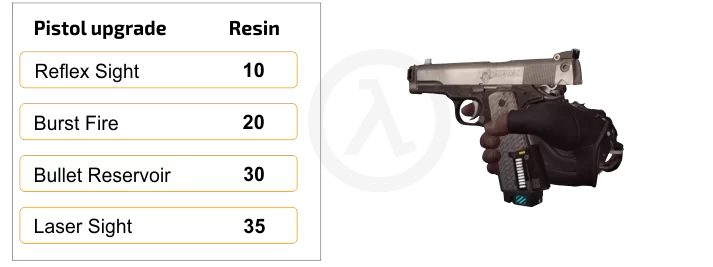
Reflex sight: Enemies vunerable areas are highlighted in orange when you look down through the sight, such as the head of a Combine soldier. This feature is especially useful in the dark, especially when you encounter a headcrab.
Burst Fire: Double-tap the top button (B) on your weapon hand, to automatically fire off 3 bullets in quick succession. Just make sure you’re on target or you’ll be wasting 3 bullets!
Bullet Reservoir: Tired of running out of bullets and fumbling around reloading? The Bullet Reservoir allows you to store a second clip of 10 bullets (20 shots in total) inside your pistol without having to reload. Simply load 2 magazines as opposed to one. So, load the first clip and press the top button (B) to engage it, then eject the empty clip, then load your second clip.
Laser Sight: The laser sight increases accuracy, helping you track enemy targets without having to focus too much on manually aiming. It’s especially useful for taking out confined groups of enemies quickly. It's an expensive upgrade, but cruitial as you move further in to the game and the combat becomes more challenging.
Tip: I wouldn't upgrade to the Reflex Sight straight away, although this will probably be the only upgrade you can afford at the time. The Reflex Sight doesn't give you much more of an advantage - the only benefit is that it highlights enemies in the dark and their weak spots, a nice touch, but not essential. You’re better off just aiming down the normal barrel sight and wait until you have enough resin for the Laser Sight or Bullet Reservoir. It's a tough decision - The Laser Sight is great for accurately targeting the enemy and definitely assists in saving ammo, however, the Bullet Reservoir allows you to store more ammo, so less fumbling around when loading. The Bullet Reservoir was my choice.
Lightning Dog
The Lightning Dog - not resembling a dog in any way apart from it being on all fours. This nasty piece of work is probably one of the smartest and fastest movers of the Headcrab species. They scurry around at super speeds, emitting blots of lightning from their body in almost every direction. If you happen to be in the path and get caught by the shocks they give off, then you'll become momentially paralised, losing a fair bit of health at the same time.

What makes the Lightning Dog stand-out from all the other headcrabs is that it has a unique defence system and when threatened, which doesn't take much, it will cloak, surrounding itself within a haze of electrical fog. So invisible right? Not quite… they can still be spotted. As it passes nearby objects it creates a loud and bright electrical discharge, giving away it’s location. You'll end up running frantically around while the little cretin mucks you.
Lightning Dogs are very tough and take a lot to kill. They can cause a lot of damage with electrical attacks, so be prepared! Just make sure your guns are fully loaded and you have a grenade ready to go. It will take five shots from the shotgun to kill a Lightning Dog. Once killed and as a reward, the lightning dog will drop a ‘Reviver’, an organic battery cell which operates the same way as a regular Combine battery and even fits into the same battery slots.
Killing the Lightning Dog
The best way to kill the Lightning Dog is with grenades, however, becasue the Lightning Dog is constantly moving you'll probably just end up wasting it. Your alternative, and probably the best option is the shotgun.
Lightning Dog Zombie
Technically a Lightning Dog Zombie is a Lightning Dog that has occupied a corpse. It’s a fairly challenging enemy, in that you need to kill both the Zombie and the Lightning Dog whilst avoiding the deadly electrical attacks.
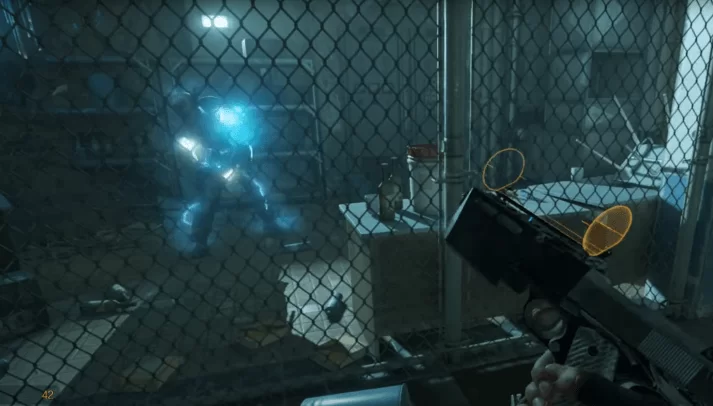
Tip: The best way to kill the Lightning Dog Zombie is by shooting the blue glowing areas within its body, which will eventually explode, forcing the Lightning Dog off its host. Then it’s just a case of popping the Lightning Dog off with the shotgun.
Half-Life: Alyx - Game tips
Stuck on Half-Life Alyx or just want some advice or tips to improve your gameplay and beat the pesky headcrabs. Hopefully some of these may help.
These tips on Half-Life: Alyx are an abstract from the game review

Don't Forget To Save
Although Half Life Alyx has an auto-save feature, it's still a good idea to save your own progress, especially in those areas where your about to confront the Zombie Dog or a nest of Headcrabs.
Resin - find as much as you can
Probably one of the most important items in Half-Life: Alyx is resin. Resin is more abundant than you think, you just have to look, even areas that appear to be a dead-end you'll probably find a slice or two. Check on shelves, in cupboards, cabinets, behind boxes, under desks, pipes and even in sewer drains... yuck!
Ammo Is Crucial
Need more ammo? Just like resin, if you look there's plenty around on shelves, lying around on floors and on dead bodies - to mention a few. Other places to look - open any large yellow cooler boxes you come across, throw down to smash wooden boxes. Sometimes shooting Barnacles will also reward you with ammo or sometimes a grenade.
Reserve Your Ammo
Find alternative kill methods: Shoot at the dark orange gas canisters to take out multiple enemies. Gas canisters can also be picked up and thrown into the vicinity of the enemy, then shot at when the timing's right. Sometimes if there's a Barnacle nearby and an the enemy walks near it, the Barnacle will suck it up for lunch, saving you ammo. Also, use the standard grenades or Xen grenades where you can.
Be Tactical When Using Grenades
Carefully open doors, just ajar, take a peek. If there's a bunch of Headcrabs or Zombies in the room use the grenade to clear the path. It will save you a lot of ammo. Although you can only store two grenades in your wrist pockets, you can still carry one in each hand, giving you a total of four at you disposal!
Take Cover and Hide
Use the environment for cover. Hide behind objects and peek around corners before you go all guns blazing. When in deep trouble run to a safe distance and re-approach with caution, pecking out our enemies with head-shots.
Pistol Upgrades: Choosing The Right One
I wouldn't upgrade to the Reflex Sight straight away, although this will probably be the only upgrade you can afford at the time. The Reflex Sight doesn't give you much more of an advantage - the only benefit is that it highlights enemies in the dark and their weak spots, a nice touch, but not essential. You’re better off just aiming down the normal barrel sight and wait until you have enough resin for the Laser Sight or Bullet Reservoir. It's a tough decision - The Laser Sight is great for targeting the enemy and definitely assists in saving ammo, however, the Bullet Reservoir allows you to store more ammo, so less fumbling around when loading. The Bullet Reservoir should be your first choice, then the Reflex Sight followed by the Laser Sight. The Burst Fire is a nice to have later on and should be the last of your upgrades.
Shotgun Upgrades
When you first upgrade the shotgun go for the Laser Sight. Later on when you have enough resin, upgrade to the Autoloader. Double shot is a nice to have but remember you can fire off two shots quick enough anyway, so not that important. The Grenade Launcher should be your next upgrade, followed by the Double Shot, the last of the shotgun upgrades... although you're probably better off saving those 25 resin blocks for upgrading the SMG.
SMG Upgrades
Upgrade to the Laser Sight first, then the Extended Mag. You would've already saved 30 resin blocks from not upgrading to the Reflex Sight and Burst Fire on the pistol and a further 25 from opting out of the Double Shot, shotgun upgrade, a saving of 55 resin blocks!
Barnacles: Alternative Ways to Kill
Barnacles are pretty stupid really, best of all they're greedy and will eat almost anything thrown at them. With that in mind - toss an active grenade into the vicinity of its tentacles or a gas cylinder. It will soon gulp it up and explode on doing so.
Headcrabs - Shoot At The Mouth
The best method for killing all Headcrabs is to wait for the Headcrab to rise back on its hind legs, exposing its tender underside, namely its mouth. Then aim and shoot there for a quick kill. This tactic certainly needs to be applied when tackling the Armored Headcrab.
Headcrab Zombie
The quickest way to kill the Headcrab Zombie is to aim for the head, basically shooting at the Headcrab. Three headshots using the pistol, or a single blast from the shotgun is usually enough.
Toxic Headcrab Pit
In chapter 5: The Northern Star (where you find the SMG), you will come across what seems to be a dirty, broken-up basement infested with Toxic Headcrabs. Don't waste your ammo shooting these, they will just keep coming. Use the Xen grenade's nearby to clear the path enough to get into the room below - taking a spare Xen grenade with you. When you've acquired the SMG, throw the Xen out the window to clear your path, then run straight towards the elevator shaft, climbing the ladder to safety.
Lightning Dog Zombie
The best way to kill the Lightning Dog Zombie is by shooting the blue glowing areas within its body (corpse), which will eventually explode, forcing the Lightning Dog off its host. Then it’s just a case of popping it off - if you can locate it that is.
Bloaters: Keep Your Distance
The best way to kill Bloaters is from a distance. Any weapon will kill one. For a quick kill, toss in a Xen grenade, use a single shot from your shotgun or shoot at it several times with the pistol. For the more adventurous - if you're very careful and time it right, you can approach a Bloater and back away just before it reaches critical mass and it will explode on it's own.
Shoot Flammable Barrels
Just like the orange gas cylinders, you'll also come across large oil-type looking barrels. They're easy to spot, they're white with a red bands. Wait until the Combine gets close to one and shoot the barrel, killing the enemy outright.
Combine Soldier: Aim For The Backpack
Some Combine Soldiers have backpacks that contain a flammable liquid. Yes, you got it! Shoot the backpack to quickly kill the enemy and others in the vicinity. It’s also a great way to split up soldiers if they are part of a squad.
Manhack Soldiers: Some Combine Soldiers can deploy Manhack's, you'll see a perfect example of how troublesome this can be near the end of the level 5 'The Northern Star', where you're constantly bombarded with these flying menesses. Take out the soldier that's releasing the Manhack's before you do anything else.
Combine Machine Gunner
Watch and listen. Wait until the gunner stops firing then peek around from cover and shoot for the head if you can. You may have to repeat the process several times, but it's the safest way to kill them.
Combine Heavy
Although the Combine Heavy is a formidable enemy, armored to the hilt and brandishing a force-field, it does have a weakness... it’s slow and not very agile! Take advantage of this flaw and try to flank it. The Combine Heavy turns around very slowly, so as he turns, move quickly to a good position, taking aim and shooting at the exposed areas, especially the head. Another tactic is timing, shooting it just after its stopped firing. Grenade ready - if the Heavy drops its shields at any point, be quick and toss a grenade at it.
Antlion - Take out The Legs
The best way to kill the Antlion is to shoot its two front legs, finishing it off with shots to the body. They can also fly into the air, exploding, so anything nearby will take some collateral damage, so be warned.
Advice - Background Processes
If you experience issues with Half-Life: Alyx, try rebooting your PC and updating your graphic card drivers. Check and turn off any unnecessary background processes that could interfere with game performance, such as a DTP program.
The best NVMe SSD based on overall performance and read/write speeds has to be the Sabrent Rocket. The name says it all 'Rocket'. Compared to many M.2 NVMes in its class, it's one of the cheapest M.2 SSDs out there. Speed-wise, this SSD has read speeds up to 3450 MB/s and can write up to 3000 MB/s, with an endurance rating of 1,800 TBW, and for peace of mind comes with a 5 year warranty.
The Sabrent Rocket is a PCIe Gen3 x 4 Interface - PCIe 3.1 Compliant / NVMe 1.3 Compliant, so it's modern and suitable for almost every modern-day motherboard... and talking of motherboards - If you're thinking of upgrading your motherboard, the MSI Meg Z390 Ace is an excellent choice and comes as standard with 3 Turbo M.2 slots. Team the Meg Ace up with a i7 9700K CPU and a Nvidia 2070 Super and you've got one hell of a gaming PC.

Storage Capicity
Sabrent has a fairly wide range of data storage options - 256GB, 512GB, 1TB, 2TB, they even do a 4TB version! - which will set you back £750 ($850).
Verdict
In my opinion the best NVMe SSD drive has to be the Sabrent Rocket 2TB SSD. If you do decide to buy one, don't bother with the 1TB version, you'll be better off with the 2TB for the little extra cash. You can find out more on M.2 and Sata alternatives here: best SSD for gaming.










Blogs | Viewing all
Become a part of the gaming community. Express your opinions, join in on the banter and have some fun!