
Here are the latest tips and tricks to help you troubleshoot and fix some common errors associated with the Reverb G2.
One of the most common problems with the Reverb G2 is when Windows cannot detect the headset. This occurs when the display adapter is not connected to the graphics card or more than often, improperly connected to the headset, usually because it hasn't been fully inserted! - Error code: 1-4 'Check your display cable'.
If you're having difficulty pushing the display adapter all the way in and the adapter stops at a particular point and won't appear to go any further, a very slight wiggle is usually enough to fully seat it. However, try not to use excessive force, just keep trying and it will go in eventually.

As you can see, the guide hole now aligns with the top edge lip of the headset, which is a good indicator that the display connector is fully seated.
This is quite a common error, certainly with the X570 chipset motherboards, more on that in a minute. If you are using a USB C Port, windows may not recognise it, in fact, we couldn't get the Type C port to work at all.
If you're having the same issue, try using the supplied adapter instead. You may also have issues if you're using a USB port on the front of you computer, so try using a USB 3.0 or 3.1 port on the rear of your PC. You may need to try multiple ports until you find one that works. Failing that, try unplugging all your USB devices, just leaving the headset connected. This should eliminate any conflicts if they exist.

If you're still having USB problems, check and update Windows 10. After that, check that you have the latest USB drivers. To do this; navigate to 'Device Manager' using the Windows search function. Expand the drop-down for 'Universal Serial Bus controllers', right click on the 'Intel(R) eXensible Host Controller' for Microsoft and click on 'Update Driver', selecting the Automatic Search option. If you manage to successfully update the driver, be sure to reboot your PC.

May I also point out, if you see the failure for 'Unknown USB device', do the same. You can also try disabling the USB device and re-enabling it. Failing that, you can try to Scan for hardware changes. This usually fixes it. Then reboot your PC.

Also see: Installing a PCIe adapter card.
Make sure that you have the most recent drivers installed for your Mixed Reality device as well as your USB controllers. If you're still having issues, try plugging the cable into a different USB-3.0 port on your computer.

HP recommends using only USB controllers built into the motherboard, as opposed to the ports on the front of the case. If trying different ports still doesn't fix the problem, you may want to try installing a PCIe adapter card.
Please, also refer to the above; Error code 7-12, ensuring your eXtensible Host Controller is up to date.
Sometimes during the resume process, the graphics card card cannot establish a connection, so unplugging the USB Type C adapter from your PC and plugging it back in may help to re-establish the connection, alternatively use the supplied adapter and plug it into a USB 3 port instead. To be honest, this seems to be a more reliable way anyway. If this still doesn't work, restart your computer.
Finally, if all else fails and you're still having USB issues, you may want to install a USB adapter hub, or better still, a USB - PCI Express expansion card.
This particular one (shown below) is ideal - mainly because it's fully compliant with the eXtensible Host Contoller interface. You shouldn't have to worry about speed either, as this card is capable of handling upto 5 Gigabytes per second.
The expansion card has 4 USB Ports that can support 3.1, 3.0, 2.0 as well as 1.1 devices. Best of all there's no messing around connecting it to your power supply. In essence, each individual port, or interface, owns 2 Amps of power, so the 4 interfaces work independently of each other, totalling 8 Amps. The card itself simply gets the power it requires from your PCI express slot.
The alternative to a PCIe expansion card, is an adapter hub. Personally, I think the expansion card is the best choice in my opinion, certainly if it's for issues related to the Reverb G2 USB errors.
If your headset was previously running at 90 hertz without issues, and you received an error saying your headset is now running at 60 hertz. This can sometimes occur if there's a glitch with you graphics card, or if your GPU isn't really powerful enough to run at 90 hertz. For those of you running an RTX 3070, 3080 or 3090, you shouldn't have any issues whatsoever. If you do, a simple re-boot should fix this. Just make sure when you go back to the Mixed Reality Portal, that the refresh rate is set back at 90 Hertz. Having said that, for those with weaker GPU's, 60 Hertz maybe the only stable option anyway!

TIP: Before you launch VR, make sure you close anything running in the background (end tasks) that's not required. This will make your VR experience far more stable.
For those with lower-end cards, I suggest you update your GPU drivers. Having said that, wait until Nvidia release new drivers... I talk more about that here; HP Reverb G2 Stuttering. P.S. If you're experiencing issues with controller tracking, you may want to replace your existing G2 controllers with Valve Index controllers (knuckles).
Anyway... getting back to the issue at hand, If you do receive the 60 hertz error message, simply disconnect the power cable to the splitter and restart Windows. Once your system has fully restarted, plug it back in, then you should be good to go.
If you happen to own a motherboard, such as the X570, or any other PCIe 4 chipset (B550) for that matter, there appears to be a known issue regarding the incompatibility with PCIe 4 (PCIe 3.0) so you could try updating your BIOS or Motherboard drivers, providing the manufacturer has a fix for it.

Having said that, a user on Reddit posted a work around to the problem, by going into the Advanced BIOS settings, selecting Onboard Devices Configuration and changing the following:

Apparently this did the trick, however, it sounds like a lot of hassle in my opinion. Anyway, for those of you who are interested, Here's the link to that discussion on Reddit
To be honest I can't see any reason why a decent PCIe 3 expansion card or USB adapter Hub wouldn't fix the issue. So if all else fails and you're still having USB connection issues, you may want to try installing a PCI Express expansion card, or USB hub. Both the devices mentioned are shown in this article and within the links at the bottom of this page.
For those of you who previously owned an Oculus Rift or Rift S, you've probably become accustomed to the Oculus Portal being opened manually, usually via the desktop shortcut. However, the Reverb works a little differently, in that the Mixed Reality Portal automatically opens on its own accord, usually after a restart and when the PC wakes up from sleep. Although this may feel strange to some, it's simply the way in which the Windows Mixed Reality Portal works with the Reverb G2. It's upto the user to simply close the app if it's not required. In fact HP recommend disconnecting the power adapter if you're not going to use it.

Admittedly it's a little frustrating having to get down on your hands and knees every time to do this. Having said that, by simply sacrificing a small amount of cable, you could attach the splitter block to the side of your case using some sticky-back Velcro tape and a couple of cable clips to keep things neat and tidy. It's a great idea!

Within the SteamVR settings, under 'General' - ensure you leave the Resolution Per Eye setting set to Auto, or within the Custom setting, leave it set to 100%.
Without getting too technical and going into how VR lenses work, there's nothing wrong with these settings. SteamVR automatically detects the correct resolution for your headset and the performance of your GPU and will set this according to your headset, so leaving it at 100% or leaving it set to 'Auto' should provide the best results. Having said that, if you do experience issues the resolution can be lowered, but this will set every app to run at the same resolution, globally!. However, if you want to change the resolution for a particular app/game; Select 'Video' > 'Per-Application Video Settings'. Then it's just a case of selecting the app/game you want to modify and lower or increase the resolution.

If you're having an issue whereby your controller sticks to one side, you can correct this by fully depressing the joystick until it clicks and it will move freely again.

This fixes the issue whereby one or both of your controllers are not visible within the WMR Cliff house or Steam VR. Usually this occurs if you've had a new replacement controller from HP, and although paired successfully, it can't been seen within the virtual environment.
You will notice the LED lights on the working controller are brightly lit, as where the lights on the other controller are dim. Although the suspect controller will still work, it won't be visible in your hand when your're within the Cliff house or Steam VR.
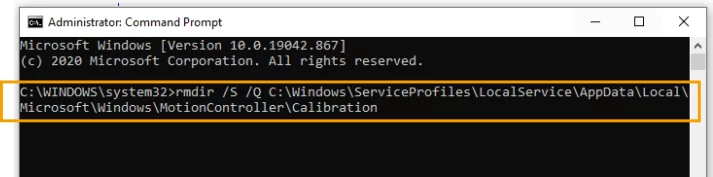
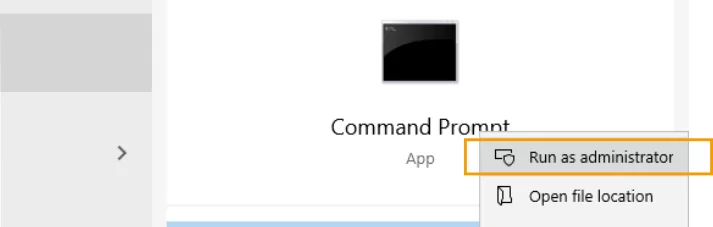
I wish there was a more intuitive way to fix this, but the path to the calibration folder isn't accessible in Windows Explorer and can only be modified via the Administrator Command Prompt.
NOTE: If you had the suspect controller turned on when running the above the fix, it may become immediately apparent that the LED lights on the controller go bright straight away. Although this is an indicator that the problem has been fixed, I strongly recommend you re-start your PC and reconnect your motion controllers to restore the calibration files.
If you happen to be gaming with friends and your voice is coming across very loud and you're experiencing audio clipping in some applications and games, you'll need to address the microphone level. This is due to the default volume level being set at 100%, which is too high.
To change this value, make sure the Mixed Reality Portal is active, then go to the bottom right corner of your desktop and right click on the 'Speaker Icon' and select 'Open Sound Settings'. Then click on 'Sound Control Panel' to the right. A new window will pop-up. Click the TAB 'Recording' and select the Microphone that has the green tick. Now select the properties button, click on the 'Levels' tab and move the volume slider anywhere between 40 and 45. Personally I think 45 is the perfect balance in my opinion. Click 'OK' and 'Ok' again to finish.

There's some useful information on Microsoft's website, specific to both the G2 headset and the Mixed Reality software, so be sure to check that out in the link section below.
You can improve the image quality in specific games by changing the VRSS option within your Nvidia Control Panel; here's the current list of games supported.

To improve the image quality for any of these Apps and Games, you need to enable 'Virtual Reality - Variable Rate Supersampling' - AKA 'VRSS'.
To do this open the NVIDIA Control Panel and select Manage 3D Settings -> click on the 'Program Settings' tab -> select the App or Game to customise, providing it's one of the games that's supported in the list above. Scroll down to Virtual Reality – Variable Rate Supersampling and change the VRSS setting to “Adaptive”.

Just to point out - VRSS is supported by the driver, so there's no game integration required and can be applied to DX11 VR games or applications that have forward renderers and support MSAA, and have been tested by NVIDIA.
VRSS is supported with Turing and higher GPUs only, and requires the NVIDIA Game Ready Driver 441.87 or higher.
Well, that's it for the G2 Trouble-shooting, I really hope you found this article helpful. If you have any tips of your own and you'd like to share them with others, please add your comments or any suggestions in the comment box below.
USB Hardware
Nvidia Drivers (Full Public list)
Rant on Nvidia's Game Driver Forum


VrOne.co.uk is a participant in the Amazon Services LLC Associates Program, an affiliate advertising program designed to provide a means for sites to earn advertising fees by advertising and linking to Amazon.com, Amazon.co.uk, Amazon.it, Amazon.de and other Amazon stores worldwide.


HP Reverb G2 Troubleshooting