Replacing an existing graphics card Windows 10
Whether your graphics card (GPU) has given-up the ghost, or you simply want to upgrade to a newer, higher spec GPU, such as the Nvidia RXT 3080 then you’ve come to the right place.
Installing a new graphics card
Removing your existing graphics card and installing a newer version is pretty straight forward, however, there are a few things that could go wrong - nothing major, but I do recommend that you follow this entire process for a trouble-free install.
STEP 1: Uninstall the Graphics Card Drivers
To avoid any possible conflicts with the installation of the new graphics card, it’s important that your old graphics card drivers and associated programs are uninstalled. The whole process should only take about 5 minutes. Follow these steps to safely uninstall your existing GPU drivers - here's how:
- Next to the Windows Start button (windows icon) in the bottom left corner of your screen, search for Add or remove programs
- Click on Add or remove programs
 Scroll down until you find the programs (apps) associated with your graphics card. Typically this would be NVIDIA or AMD, depending on the graphics card you currently have installed.
- Find the ‘Graphics Driver’, click on it and select the ‘Uninstall’ button. A pop-up prompts you to confirm the ‘Uninstall’ - click ‘Uninstall’. Further prompts will pop-up to assist you in removing the program (driver). Just follow the instructions for removal. Once removed, Windows may want to restart. That’s okay, let Windows restart. This will ensure the drivers are removed correctly.

Make sure you restart!
- Repeat the above process and remove the remaining programs associated with the graphics card. Again! If Windows prompts you to restart the PC, select the option to restart the computer. You may have to do this several times during the full uninstall process.
If visible, also remove the Windows Driver Package.
After you have uninstalled all the drivers, double check that they have been removed, repeating steps 1 - 3. You shouldn't see any drivers associated with your graphics card.
HELP: Windows keeps reinstalling the GPU drivers automatically
STEP 2: Remove and install the new Graphics card
The next part of the process is replacing the old graphics card with the new one. The install process is fairly easy, if you are prepared - just be careful and take your time, paying particular attention to the following:
- Power Supply: Ensure your power supply unit (PSU) is powerful enough to run your new graphics card, as well as the CPU, other hardware and peripherals. Typically you don’t really need a powerful PSU, a good quality 450 - 500 Watt PSU is usually more than adequate, however, for some high-end gaming PCs and custom builds that utilise overclocking, a 600 - 750 Watt PSU is recommended. For more information on PSUs, check out the recommended PC Power Supply for your GPU.

- Power Cable: Another important thing to point out is the power cable(s). Newer high end graphics cards, such as the RTX 2080 Ti, require x2 8 pin connectors, as does the Nvida RTX 3070, 3080 and 3090. The Nvidia RTX 3000 series uses a 12 pin connector, but does come with a converter for 8 pin connectors. Phew!

STEP 3: Graphics Card Installation Tips
- Make sure you have the new graphics card unboxed and ready for installation, leaving it in the anti-static bag right until it’s needed.
- Don’t forget to remove the protective plastic/rubber* guard that covers the primary male PCI Express connector. You won’t be able to slot it into the PCI Express slot with it on - attempting to do so may damage the GPU or the motherboard.
- Put the PC on a desk or table. You’ll find it much easier to work on.
- Make sure you have good lighting. A miniature LED head-torch is the ideal choice.

Optional: While you operate on your PC, now’s a good time to perform some maintenance. Give the components a good dusting using an artist's brush, and blow the various parts, nooks and crannies using a can of compressed air. At the same time you may want to tidy up those cables.

- Shut down and turn off your PC, then turn off the power from either the wall socket or via the power supply switch.
- Unplug everything from the back of the computer. If you can, leave the power cord connected, as it acts as an earth, but make sure it’s turned off.
- Remove the side panel from the case, exposing the internal components.
- Touch the metal carcase of the case with your hand to release any static you may have picked up.
- Locate the graphics card and pull out the power connector block(s) from the top of the card. They clip securely in place, so you will need to pinch the retainer clip while pulling and wiggling it out.

- Unscrew the fixing(s) or unclip the tabs which hold the graphics card in place. Place any fixings that are removed into a small container for safe keeping.

- Unclip the graphics card: There are generally two types of clips used to hold the graphics card in place. It will either be a plastic clip that you push down (as shown below) or a lever clip (usually blue or brown in colour) which is pushed sideways. You should hear a click as it is released.

- Carefully remove the graphics card from the PCI Express slot. Try to remove it by touching its edges, avoiding the circuitry. Place it somewhere safe.
STEP 4: Install the Replacement Graphics Card
- Insert the new graphics card into the PCI Express slot, pushing down until it clips in place, or if you have the lever type clip, push it to the side as you slide it in. *Make sure you have removed the plastic cover from the PCI Express connector - the part that slots into the Motherboard.
- Screw the graphics card back to the chassis.
- Push the power blocks into the graphics card. Just make sure you have the correct amount of pins for the type of card you are installing.
- Perform a visual check to make sure everything is connected properly and you haven't accidentally pulled out any wires.
- Turn the PSU power on and power-up the computer. Check that the fan on the graphics card is spinning, including any additional internal fans you may have.
- Power down the PC and refit the side panel.
That’s it with the installation. All you need to do now is reconnect all your devices, monitor, keyboard, mouse etc, and install the graphics card drivers.
STEP 5: Installing Graphics Card Drivers
Graphics card drivers are a doddle to install. The entire process should only take about 10 minutes. You'll need to head-off to the manufacturers website to download and install them.
Nvidia graphic card drivers: Nvidia has a handy utility ‘Nvidia GPU Scan’ that scans your system to check which card you have installed, however, you are prompted to install a java app to allow it to perform its scan. Failing that, you can download the drivers from the Nvidia Download Index. The process is very intuitive. Simply select your graphics card from the menu, click search and download. Once downloaded, click open to install the drivers, following the onscreen prompts. There are two types of install; Express and Advanced. Choosing the default Express installation is always recommended. Only select the Advanced set-up if you know what you are doing.
 AMD graphics card drivers: AMD also has a nifty app that auto-detects and installs the correct drivers for your graphics card: Download from here: AMD Driver Detect. They also have some excellent support documentation should you get stuck: AMD Product Selector. Once you have downloaded the drivers, click open to install it, following the onscreen prompts.
Congratulations! Everything should be set-up correctly and now working.
If you would like to leave any comments, please enter them in the comments section below
Windows keeps reinstalling my graphics card
Depending on how Windows 10 is set-up, Windows will sometimes automatically attempt to reinstall your graphics card, this often happens if a faulty driver was previously installed via Windows Update or Windows has detected a new piece of hardware. To prevent Windows from reinstalling the graphics card drivers, follow these steps.
- Use the Windows Search function located in the bottom left corner of your screen, search for View advanced system settings
- Click on View advanced system settings. This will trigger the System Properties pop-up window to open.
- Select the Hardware tab located at the top.
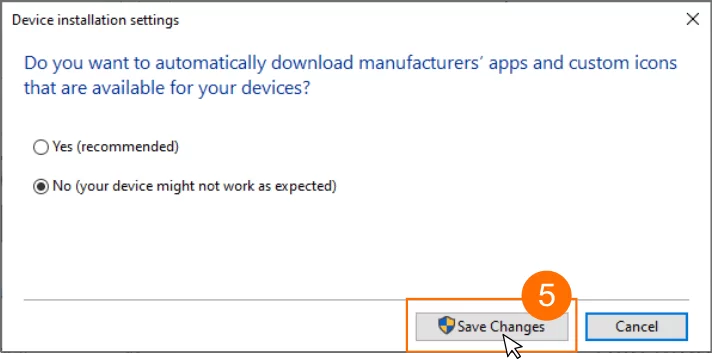
- Click on the Device Installation Settings button. A new pop-up window appears, prompting you whether you would like Windows to automatically download manufacturers’ apps that are compatible with your devices.

- Select the option No (your device might not work as expected)* and click on Save Changes.
![]()
*Note: By disabling the setting mentioned above, none of your current devices, including any devices you connect at a later date, will receive any automatic driver updates from Microsoft via Windows Update. You can turn this feature back on once your new graphics card has been installed, repeating steps 1 - 5, choosing Yes (recommended).
Repeat the process: Uninstall Graphics card drivers if the drivers and programs still remain.
If you would like to leave any comments, please enter them in the comments section below.

 Scroll down until you find the programs (apps) associated with your graphics card. Typically this would be NVIDIA or AMD, depending on the graphics card you currently have installed.


 AMD graphics card drivers: AMD also has a nifty app that auto-detects and installs the correct drivers for your graphics card: Download from here: AMD Driver Detect. They also have some excellent support documentation should you get stuck: AMD Product Selector. Once you have downloaded the drivers, click open to install it, following the onscreen prompts.


How to install a graphics card